

This Christmas, I managed to persuade my son that what he really wanted was a 3D printer. He’s into military history and recreating famous battles while playing miniature wargames. (Miniature wargames are basically posh boardgames, with tiny soldiers, tanks, vehicles etc. rather than boring old plastic counters.) He was sold when I showed him some of the models that other people had printed. It barely crossed my mind that it might possibly be of some use for the shed projects…


Creating The 3D Model
There are a lot of very nice designs to print available free (or for a modest fee) but if you want to make something of your own design, you’re going to have to get a 3D drawing of it first. I use Solidedge, because that’s what I have access to. There are many free 3D packages available, but whatever package you choose, the learning curve will not be without its frustrations. Expect to spend some time working through tutorials to get the hang of it before you can start with your own designs. Again, Google will throw up lots of options. TinkerCAD is supposed to be beginner friendly. Fusion 360 is a professional package from Autodesk. Hobbyists and small companies can qualify for free access to it.


Preparing The Model For 3D Printing
Once you’ve successfully generated your model. You need some more really clever software to take this model, slice it into layers, and produce the code that controls the printer. I’ve used one called Cura. Again there are many programs available to perform this and I just picked one. So far, Cura seems Ok.
First step, make sure you save your CAD model in a format that the slicing software can import. Next, set up the parameters for the print, including telling Cura what printer you’re using. The screenshot of the Cura program below, shows some of the basic variables that need to be set. (These are just the main titles, clicking on these reveals many, many more criteria to tinker with!) Once set, Cura then proceeds with the slicing and also estimates how long the print will take.
Printing The 3D Object
Our printer is an Athorbot Buddy. At the time, the description on Amazon seemed to offer the best compromise between assembly time (there are only a handful of bits that need to be bolted together, and all tools are supplied) specification and price. Recently the price has risen somewhat and I’m not sure that it would be the one I’d pick now. Despite being easy to assemble, after that, the documentation supplied with this printer is minimal. You’re pretty much left to your own devices to work out how to use it once it’s been built. There are a few screenshots in the booklet showing you which parameters you need to set in Cura to suit the printer. Sadly, these are so small that they are difficult to see and anyway refer to an older version of Cura, so don’t make much sense. It’s very much down to Google research and trial and error. (Expect a lot of error!) Given my experience with this printer, and seeing that a 3D printer’s construction is fairly basic, I think I could have saved money by buying a kit version. The Geeetech ones are inexpensive and get good Amazon reviews.
Printing The Swingarm Bolt Cover
The Athorbot has a slot for an SD card allowing the printer to work independently of the computer. This is probably it’s most useful feature. So it’s a case of transferring the file produced by Cura to an SD card and then loading it into the card slot on the printer.
Menus and options are selected by using the knob on the right hand side of the small display screen. (Turn to scroll, push to select.) Many settings and options can be selected or altered but Athorbot again leave you to your own devices here. No mention of these is made in any of their literature.
Trial and error eventually finds a menu for loading a file from the SD card. Pick the file and off you go. Well almost. First make sure that the plastic filament is correctly loaded. How do I do that? Are there any instructions? No. Oh, well. Time to Google for an answer again.
Athorbot also include a reel of masking tape in the box, but no mention of why. It’s actually to put on the bed of the printer to allow the first layers of the print to ‘stick’ securely. (If it moves during printing then your printout will be useless and given that large prints will take hours to produce, you really don’t want this to happen.) For some printouts, even this is not enough and some pritt stick on top of the tape helps. Once all this is done, you can then start printing.


First layers of the print going down (on the left or above on a mobile). Below, two that didn’t work. The one on the right came loose from the bed during printing. The one on the left broke during testing because: a) I made areas of the sticky up bits too thin and b) It was slightly too large anyway, putting everything under too much stress when inserted into the hole on the bike’s frame.


I found that the printed model was always a bit bigger than the one I’d drawn in the CAD package. I’m not yet sure where the errors occur. Whether it happens when the file is transferred from CAD to Cura. Whether it happens during slicing. Or, if it’s just caused by the resolution and accuracy of the printer. I just don’t know yet. I temporarily solved the problem in this case by measuring the size of the first finished one, then producing a new CAD model with the dimensions altered accordingly. This then printed one to the ‘correct’ size.
Conclusion
Pros…
Smaller and (possibly) cheaper and lighter than a lathe or milling machine. Great if you don’t have much space.
Although you shouldn’t leave it running unattended, you can be doing something else while you mind it.
You can produce shapes and features that would be difficult to machine conventionally.
Cons…
Steep learning curve. There are numerous settings and parameters which all have a bearing on the quality of your print.
Materials available for DIY use printers restrict it to non-structural parts.
If you want to make parts of your own design, you need to be able to access and use 3D CAD.

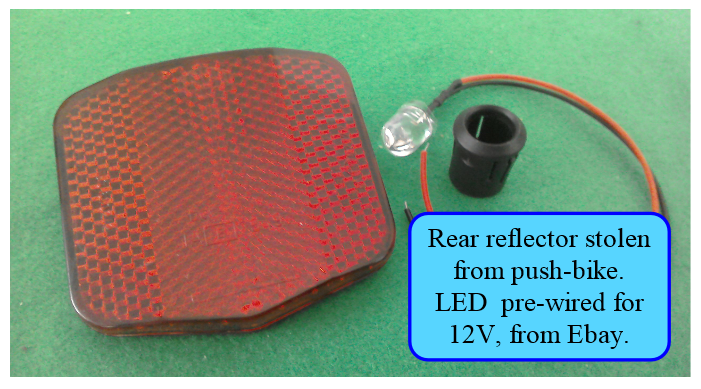
While wading through all 207 pages of the MSVA manual to try and ensure that I’d satisfied all requirements, I realised that I’d overlooked the need for a rear reflector and number-plate light.
Having spent some time on Ebay looking at what was available, I finally decided to try to make something bespoke using the 3D printer.
A red reflector was liberated from one of the many old push-bikes kicking around the shed, and some white LEDs, pre-wired with the appropriate resistor to allow them to run directly from 12 Volts, were purchased from Ebay.
Now I just needed to come up with a design. A mock up cardboard number-plate was fashioned as I tried to work out at what sort of angle / distance the LEDs would need to be mounted at in order to successfully illuminate the number-plate.
With some rough measurements and ideas, I moved onto the bit that I find hardest, drawing it in 3D on the computer. Now the CAD package I have is very good, but as a self-taught CAD pilot, it’s not always intuitive. I’ve kind of got the hang of drawing things, but I’m not so good at editing them. If I want to move a hole’s position, or change the size of a feature, I find it easier (and less frustrating) to re-draw the whole thing, rather than try and alter what I already have. I’m sure if I used the CAD package and the 3D printer a lot, it’d all make sense, but as it is often weeks between uses, it takes a while for me to work out what’s going on, why it’s not doing what I want and what I need to do to correct it! And as I’m not always very patient, there is often much swearing and cursing. Anyway, eventually, the first version got printed.
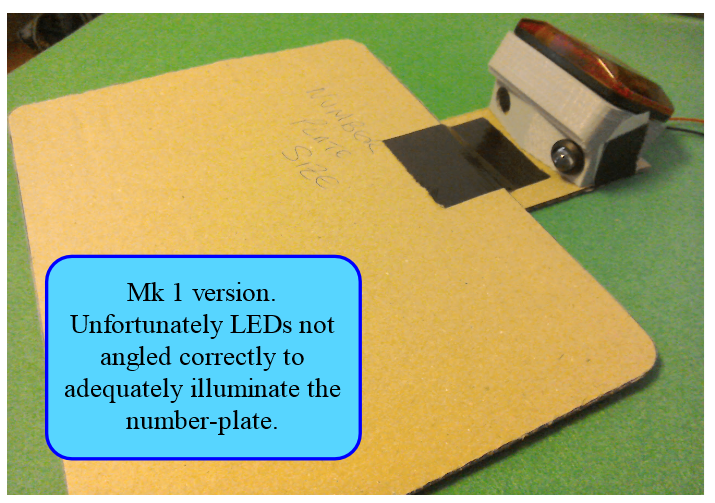
This version printed OK, but it was evident once the LEDs were fitted that they needed to be angled slightly differently to adequately illuminate the number-plate. Also, no white light should be visible from the rear of the machine which sounds a bit confusing when you’re trying to light something up. Basically what it means is, the LED’s light can shine onto (and be reflected by) the number-plate, but light direct from the LED should not be visible from behind. My first design didn’t satisfy this requirement, so a second version with a wall around the LEDs was designed and printed.
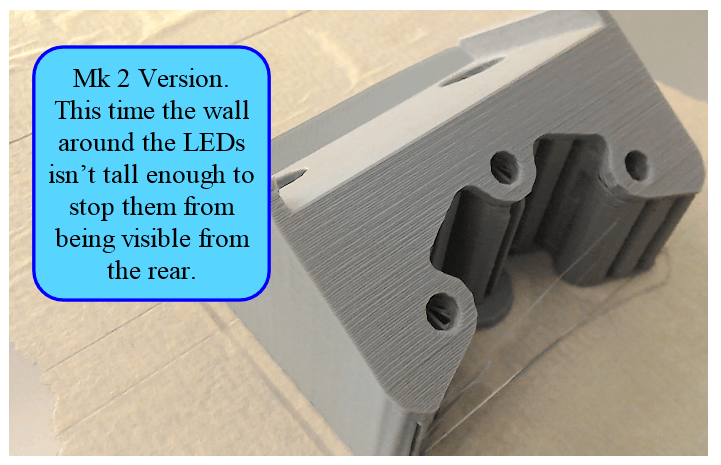
This one printed very well, it was just a shame that when I fitted the LEDs, it was obvious that I hadn’t made that wall tall enough. Oh well, onto the Mk 3 version.
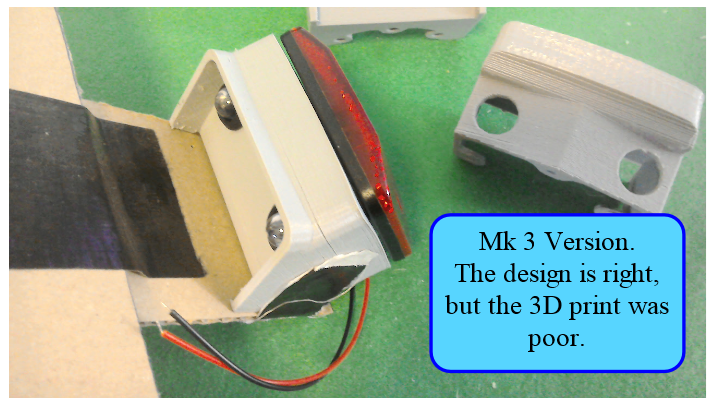
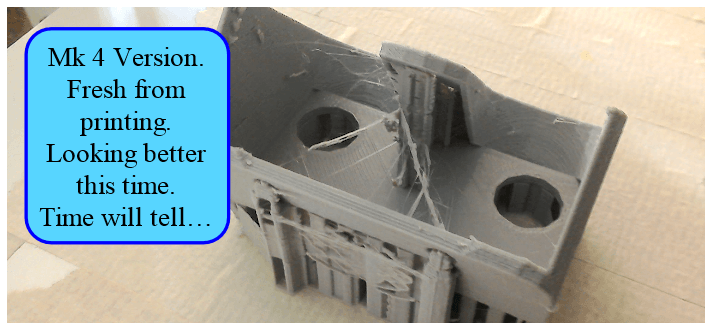
Finally, with the Mk3 version, the LEDs are at the correct angle, they’re not visible from the side or rear, and the rear reflector fits Ok. It’s a shame then, that this one didn’t print very well. Some of the layers haven’t stuck well together and there’s some warping going on. So, although we now have the design right, a better one needs to be printed. A bit of modification to the printing parameters will (hopefully) solve these issues. And that’s where we are at the moment. Number 4 has just been printed, it’s better than number 3, it just requires me to finish and mount it. More about that in part 2…

Ah, the continuing story of the number-plate light / reflector unit. In the last installment, I had got as far as printing the Mk4 version, and this one looked good. In fact, it looked really good. Reflector and LEDs were mounted and it gave enough light at a suitable angle to illuminate the number-plate. See, there it is, in the picture below.

Then I thought I’d offer it up to the bike...

Nuts and double nuts. I’d overlooked the fact that the GS500 tail-light lens is angled. If you look carefully at the picture above, you can quite clearly see the two LEDs reflected in the light lens. I wasn’t sure if the MSVA tester would be too happy with this, so I needed to come up with a solution (and fast because I’d already spent too much time on something that I felt should have been a simple job).
In the end I came up with the solution pictured below. It’s not a pretty or elegant, but hopefully it will tick all the relevant boxes. The reflector unit and number-plate light have been split. A single, 10mm LED, is mounted in a 3D printed housing above the rear light, shining down onto the number-plate area. It has a simple stainless steel bracket.The reflector now has its own, much smaller than previous, 3D printed mounting.
It’ll do for now…
