Offbeat Bikes Magazine
 May 2018 
Offbeat Bikes Magazine - Put that light out
   In the last issue of the magazine, we were looking at testing switchgear. As part of that article, I purchased a set of Chinese switches to have a look at. For budget builds, the price of far eastern products makes them very attractive, but are you wasting your money?
   I spent around £3 for the switches shown below, and first impressions are that for the money they’re pretty good. They feel solidly built, much sturdier than I was expecting in fact, and the switches have a positive action. There is a slide switch for operating the indicators, a momentary push switch for operating the horn and a latching switch for the lights. As it stands, this light switch could only turn your headlight on or off, not switch between dip and main beam. So, if that suits your needs and you’re on a tight budget, they may be worth a look, but…
Chinese switchgear. Cheap, but is it any good?

 You knew their was going to be a but, didn’t you?

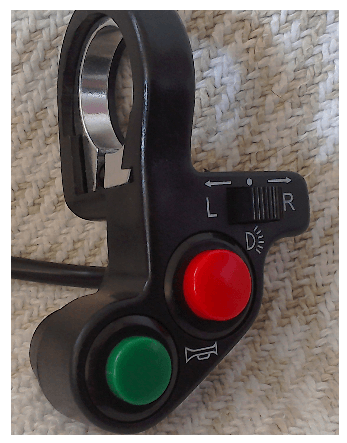
  The first issue may or may not be a problem, depending on how easily your handlebar grips come off. The single screw clamp design means that you have to slide the switches onto the handlebar, and you can only do that after first removing the grip.

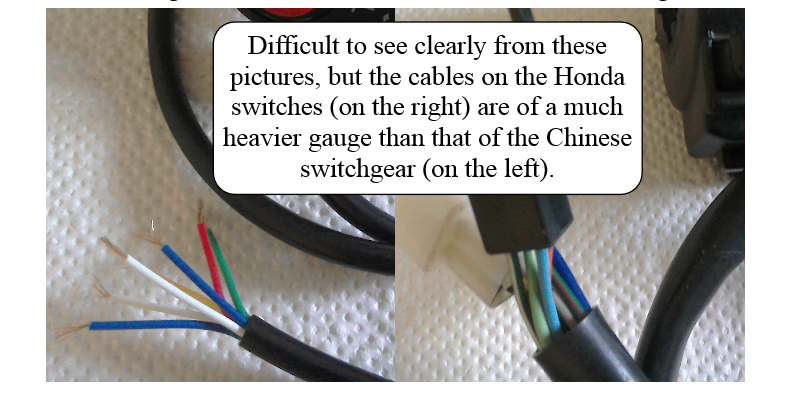
 The second problem could cause more serious issues. The switches are connected up using really small diameter wire. The cross sectional area of a cable determines the amount of electrical current that it can safely carry. I haven’t yet calculated the cross sectional area of these cables, but I can tell you that they are of a considerably smaller diameter than the cables fitted to some Honda switches that I have to hand. What does all this mean? Well, basically if you are attempting to use these to control a high current load i.e. a big wattage headlight, then things might start to get a bit warm!

  You could replace the cable supplied with heavier duty stuff, but the switches will also have a safe current rating, and there’s no telling what that may be for these controls, since they are supplied with very little in the way of information / specification.
  All is not completely lost however, as LED lights have a much lower current requirement. I’ve not fully investigated it yet, but it may be that for LEDs, these would be fine to use.
   More on cables and wiring in the next issue of the magazine. 
Comparison between Honda and Chinese switchgear
Offbeat Bikes Magazine Monday Article - Another Screw Up?
  Although for many years, you may have been happily working on your Japanese motorcycle using your standard screwdrivers, it seems (according to the mainstream motorcycle press) that we should really have been using JIS screwdrivers. Why, if they are so important did we not know of this years ago? Japanese motorcycles have been common for many decades after all.
  I don’t ever remember JIS screwdrivers as being listed as a required ‘special’ tool in any of the factory workshop manuals I’ve looked at. So are they really necessary?
 I bought a set to look at, and these are my musings.

Please note, that I really do buy this stuff with my own money. I’m not given freebies in return for a plug or favourable review. Nor am I involved in any affiliate marketing schemes. I’m not trying to sell you anything, merely sharing my findings as I persue my motorcycling hobby. If this should ever change, I’ll be sure to state it clearly in the article concerned.

 If, like me, you mostly work on Japanese motorcycles, you may have seen the virtues of JIS (Japanese Industrial Standard) screwdrivers extolled in the mainstream motorcycle press. Apparently, the screws used on most Japanese motorcycles are made to this standard and undoing them with standard ‘Phillips’ screwdrivers could chew up the heads. (A JIS screw head is often marked with a dimple, to help with identification. So if you’ve looked at your bike and seen screw heads marked with a dimple, now you know why! ) So, because it’s not actually very hard to convince myself that I need new tools, I bought a set to see if they really made a difference.

   From the choices available, I picked a Laser tools branded set. Laser kit is usually OK for DIY stuff and this set was reasonably priced, so I didn’t feel too guilty about spending the money!
Offbeat Bikes Magazine Laser JIS Screwdriver set review
   If you have a look on the internet, there are lots of diagrams depicting the difference between JIS and Phillips screw heads and screwdrivers, so I won’t reproduce them here. You can have a ‘Google’ if you’re interested. What I will say is that the general consensus is that it is OK to undo a Phillips screw with a JIS screwdriver, but not the other way around.  
  That may explain why the Laser screwdrivers are labelled with both JIS and Phillips (PH) designations. Or it may be that they are just the same thing and it’s just a marketing ploy to relieve us of our money!
Offbeat Bikes Magazine JIS screwdriver review
  I compared the Laser JIS screwdrivers with some (old) Teng tools PH screwdrivers (see pic above), and even inspecting them through a jeweller’s loupe, I couldn’t see any real difference. The biggest obvious difference was that the Teng ones had seen some hard use and were quite worn.

  So, is it worth buying special JIS screwdrivers?

  Well, no, I don’t think you need to rush out and buy any if you’re happy with what you currently own. I used this set to service a bank of Suzuki Bandit carbs, and they did undo the screws without drama, but I felt that this was due more to the fact that the tips were nice and new, rather than a vastly different design to my old Teng ‘drivers. But, if your current Phillips screwdrivers are looking tired, then a set like these Laser screwdrivers, which are designated both JIS and PH, may be just the job.
Offbeat Bikes Magazine Monday Article - Measuring Part 1
  I thought I’d do a short article about measuring tools that you might find useful in the workshop. It wasn’t until I started to sort out the tools for picture taking that I realised just how many I owned! So now it’s a three part article. What you use, will, of course, depend on exactly what type of work you’re undertaking. If you’re just making cosmetic changes to your bike, then a steel rule and a tape measure may be all you need. I’ve also got a 1m long steel rule (difficult to photograph because of its length!) which sometimes proves more useful than a flexy, bendy tape measure.
Offbeat Bikes Magazine - Measuring tools

 If you need a bit more precision, but still want to measure things across a wide range of sizes, then vernier calipers may be a good choice. Once upon a time, these used to be very expensive (and you had to be able to read the vernier scale - see pic., right).

 Fortunately advances in technology have produced the digital vernier. Easy to read, available in many different lengths, and thanks to far eastern imports - cheaply available. People may sneer at these, but for hobby use, they’re perfectly acceptable. By all means, though, go for the big brands if you have the funds available.

Vernier Calipers Of Different Lengths And Types
  The digital vernier caliper is a versatile instrument, being capable of external, internal and depth measurements. Its ease of use means that anyone can pick one of these up and use it. However, the results obtained are only as good as the operator using it. It’s not a vice, or clamp, so don’t use excessive of force, especially if what you’re measuring could distort under the pressure. It also relies on the jaws being clean, undamaged and parallel. So look after it, try not to drop it and make sure it is zeroed before use!
  It’s ease of use often leads to abuse and was (rather unfairly) nicknamed ‘The digital guessing stick’ by one QC manager I knew. As with all measurements, it pays to take several readings to ensure that you are getting a consistent result, before you start cutting, or claiming that you have machined it to the correct size etc.

Part 2 Next Week!
Offbeat Bikes Magazine Monday Article - Measuring Up Part 2
  In part one, we looked at the low tech steel rule and tape measure, before moving onto the more hi-tech digital vernier. Now we’ll move on to feeler and dial gauges.
  Feeler gauges are usually used to measure the clearance between two parts. The gauges are slips of metal whose thicknesses have been accurately ground. Although more often used when working on the engine of your bike for checking valve clearances, crankshaft side clearance, points gaps etc., they can also be useful on the chassis if you’re trying to fit engines, wheels and so on into spaces that they weren’t initially designed for. You can then work out what size shims or spacers are needed in places where it’s almost impossible to fit a traditional measuring instrument.
  Feeler gauges don’t have to just be used singly, they can also be used in combination to make up whatever size you require. Not all feeler gauge sets are the same, so make sure you purchase one with the range of sizes you require (or you’ll end up with 3 sets like me). Some sets don’t have the very thin ones that you may require for setting valve clearances. You also have a choice between straight, or angled blades.
An assortment of feeler gauges.
  The dial gauge (or dial test indicator, if you’re posh) is most often used in the workshop for setting up parts before machining operations. But, they are also useful for measuring the runout of brake discs and wheels (especially if you have spoked wheels).
  The gauges come in two flavours, plunger or lever types. (See pic. below.) There are pros and cons for both types. I personally prefer to use the plunger type whenever I can, only reaching for the lever version for jobs where the plunger physically won’t fit.
  To obtain truly accurate readings, you should try to make sure that plunger versions are set perpendicular to the surface to be measured, and for lever versions, the needle should be set parallel to the surface to be measured. If they are not aligned correctly, you won’t get a true reading - Google ‘DTI cosine errors’ if you want to see why!

Part 3 Next Week!
A selection of dial gauges (DTI).

Share by: